Just develop!
Robert Ris praises 11...Bb7!? in the Marshall Attack
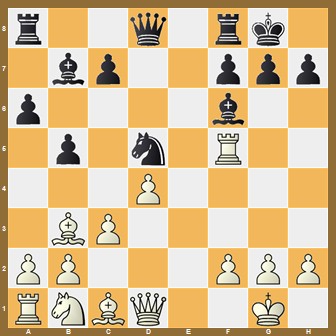
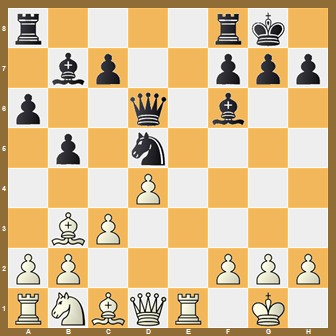
Our starting moves are 1.e4 e5 2.Nf3 Nc6 3.Bb5 a6 4.Ba4 Nf6 5.0-0 Be7 6.Re1 b5 7.Bb3 0-0 8.c3 d5 9.exd5 Nxd5 10.Nxe5 Nxe5 11.Rxe5 Bb7!?.
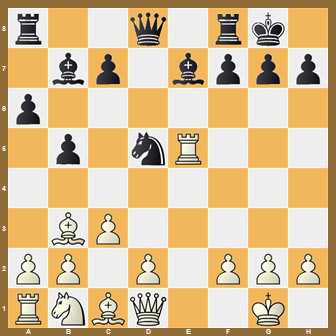
The Marshall Attack (8...d5) in the Ruy Lopez is feared by many chess players; though there are a lot of people who have consciously decided not to include it into their own repertoire. Almost all the lines have been worked out till move 40 and as Black you actually need to memorise a lot of lines, as otherwise your compensation for the pawn simply might not be sufficient. Not so much fun, as you can imagine. This article may change your opinion on this opening variation, as I am going to investigate the lesser known 11...Bb7, which is in my opinion a playable alternative to the main continuation 11...c6.
By developing the bishop to the long diagonal, Black makes their intentions clear and hopes to launch a powerful attack with the aid of the mighty bishop pair. Evidently, matters aren't that simple. In addition, Black retains the option of playing the move ...c7-c5 which is, positionally speaking, a nice improvement of their position.
In the diagram, White has basically only two serious moves, A) 12.Qf3 and B) 12.d4.
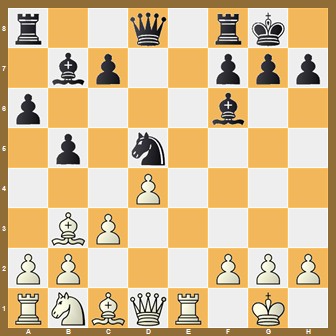
A) 12.Qf3

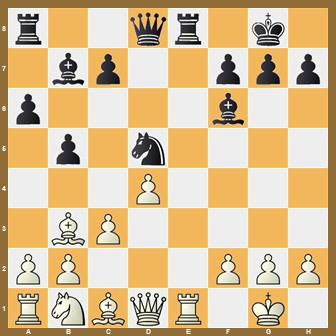
A direct attempt to exploit the slightly vulnerable placement of the black minor pieces on b7 and d5. However, Black has the excellent resource 12...Bd6! at their disposal.
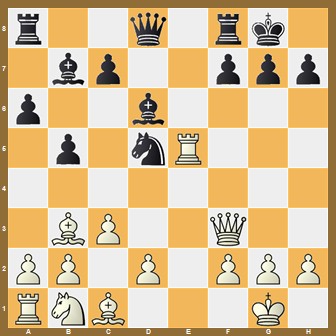
Now both 13.Re1 and 13.Rxd5 are actually already losing for White, see analysis of the game Borjini,M - Abicht,H 1-0.
Instead, the main line goes 13.Bxd5 c6!
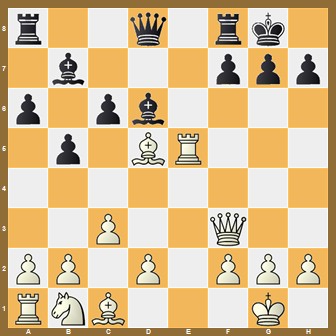
after which the rook has to retreat somewhere on the e-file. In the analysis of the games Ivanchuk,V - Kamsky,G ½-½ and Saric,I - Gukesh,D ½-½ you'll find that Black obtains sufficient compensation for the pawn.
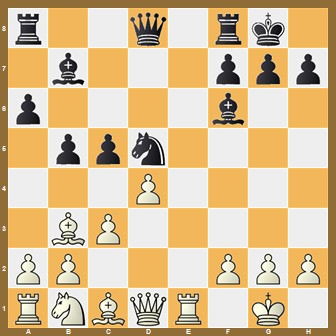
B) 12.d4
The most natural way to proceed is White's main option. Black is recommended to follow up with 12...Bf6
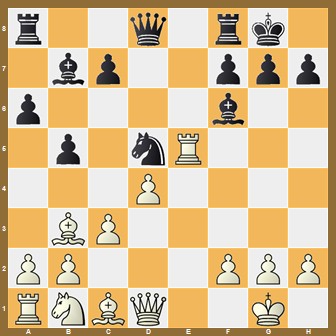
when White gets a choice:
B1) 13.Rf5
Frankly, this move looks a bit strange and has only been played once. However, since it was Nakamura handling the white pieces I think we better take it seriously. In my analysis you'll see that Black has various reasonable ways to respond. Not a surprise, as the rook is slightly misplaced on the f-file. See Nakamura,H - Predke,A 1-0.
B2) 13.Re1
The most natural square for the rook. Black has a number of options.
B21) 13...c5?!
Sacrificing a second pawn is an ambitious attempt to create active play. This idea was first employed in 1993 in the game Anand,V - Short,N ½-½. However, the engine is quite critical and shows that White can count on a clear advantage if they go for 14.dxc5 Re8 15.a4!?.
B22) 13...Qd6
This queen move is common plan in Marshall positions, Black connects the rooks, and is ready for some active play in the centre. In the game Tan,Z - Kosteniuk,A 0-1 there followed 14.Nd2 Rae8 15.Bc2 Rxe1+ 16.Qxe1 Qc6 and here I believe the improvement 17.Be4!

is still quite unpleasant for Black.
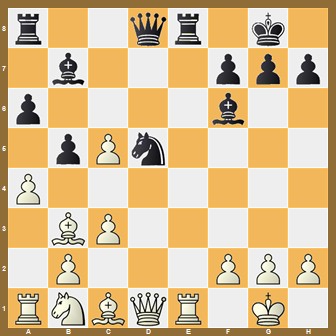
B23) 13...Re8
Contesting the e-file is Black's most promising option, and has been played by various top GMs, including Magnus Carlsen. A small overview:
1) In the game Howell,D - Carlsen,M ½-½, White decided to swap the rooks (14.Rxe8+) but soon got a slightly inferior, though holdable position.
2) Another approach is 14.a4?! but after 14...b4!

White got some serious problems regarding their queenside development. A very instructive game is Hjartarson,J - Adams,M 0-1.
3) 14.Bd2 does look an anti-developing move, as the bishop deprives the knight from going to d2. The main point is that it does control b4 a bit more. An interesting game is Anand,V - Hracek,Z 1-0, in which Black played 14...a5 aiming to prove positional compensation for the pawn. In more recent encounters people have experiment with the more direct 14...Rxe1+ 15.Qxe1 and now 15...b4!? anyway, which may lead to insane complications. There is something for everyone in the Marshall!
4) 14.Nd2 is a logical move, but has the clear drawback of giving up control over the f4-square. The sequence 14...Nf4 15.Nf3 Bxf3 16.Rxe8+ Qxe8 17.gxf3 Bg5 18.Bxf4 Bxf4
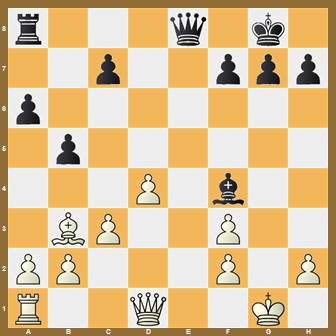
is quite logical. White's kingside is too vulnerable to claim an edge thanks to the extra pawn. In the notes to the game Santos Latasa,J - Raja,H 1-0 you'll come across some fascinating lines, but with correct play the position still remains balanced.
5) The latest try is 14.Na3 with the idea of bringing the knight to c2. Black is supposed to reply with 14...b4!,
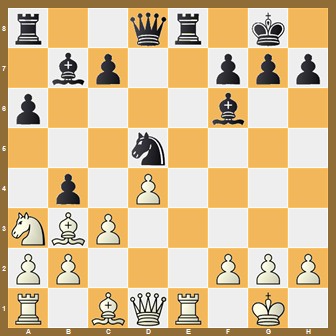
thwarting White's original plans, but allowing the knight to come to c4 instead. In the game Wei,Y - Erigaisi,A ½-½, Black came well prepared, and comfortably drew.
Conclusion: In my opinion 11...Bb7!? has replaced 11...c6 as the absolute main line of the Marshall Attack. Both moves are equally good objectively speaking, but developing the bishop comes more naturally. In addition, 11...Bb7!? certainly does require less memorisation of forcing variations which one needs to know in the lines with 11..c6. An excellent practical weapon for Black!