ChessBase Magazine
The fortress
Knight vs. Rook and Pawn
by Dorian Rogozenco
Video introduction
Normally, a game in which you are down not only a pawn but also an exchange is, of course, lost—especially in the endgame. And yet, certain positions can still be held to a draw despite the material disadvantage with the help of a fortress motif.
The classic motif discussed in Dorian Rogozenco’s article this time looks like this:
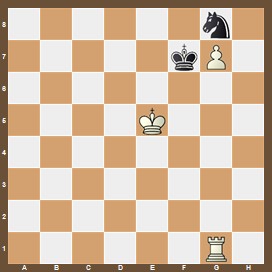
The knight prevents the white pawn from promoting and jumps back and forth between the promotion square and the squares h6, f6, and e7. But be careful: In this specific position, 1…Nf6 would, of course, lose immediately due to the pin 2.Rf1. The other two moves, however, maintain the fortress.
After 1…Ne7, White can attempt to approach the black fortress with his king in two ways: After 2.Rg2 Ng8 3.Kd6, the knight can move safely to f6 (and, on top of that, threaten the fork …Ne8). And after, for example, 4.Ke5, the knight simply returns to g8.
If the white king tries on the other side, it can force the following position:
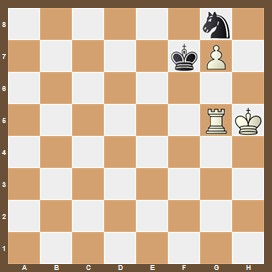
Only if the king manages to move from h6 to h7 can they win the game. Black’s task is therefore clear, and only 1…Kf6 maintains the fortress. But with 2.Rg2 Kf7 3.Rg6, White can further increase the pressure. Once again, there is only one move that saves Black: 3…Ne7 forces White to move his rook again—because after 4.Kh6 Nxg6 5.Kh7 Ne7, the knight is back in time.
This fortress also holds up if we shift it to the left and the attacking pawn is on, for example, c7, d7, or f7. If, on the other hand, the pawn is on h7, it is no longer a fortress, because here the knight quickly runs out of options:
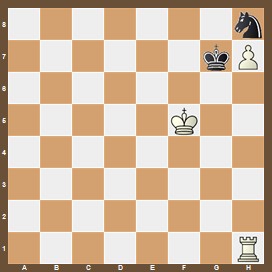
White can simply sacrifice the pawn with 1.Rg1+, because after 1…Kxh7 2.Kf6, the game is already over.
In the second part of the video introduction, Dorian Rogozenco explains why the pawnless endgame with a knight is a draw in most cases—provided the knight is not so far from its king that it can be cut off by the attacking pieces. And—this is another important detail in the context of the fortress motif discussed above: Black should not be tempted to capture the g7 pawn with their knight!
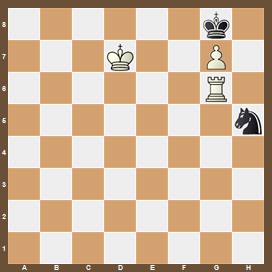
After 1…Nxg7, White wins: 2.Ke7 Kh7 3.Kf6 Nh5+ 4.Kg5 Ng7 5.Ra6! +-
So: “Black shouldn’t even try to make any progress!”
Interactive Training Videos
1) Neumann-Steinitz (1830). White moves and holds a draw
2) A change of perspective—How does White hold a draw?
3) Black moves and holds a draw
4) White moves and wins!
5) A tough one: White moves and wins!